fasheng的博客

自在 平和 长久 共一

利用 Pycairo 为图片添加阴影特效

| Comments | posted in 代码_编程技能 with tag cairo, 图形学, 程序示例

为图片添加阴影特效并不复杂,因为图片多是矩形,我们首先实现一个绘制 rectangle gradient 的函数,其中四个边角利用 radial gradient(径向渐变, 这里 有一个示例)绘制,剩下四条边用 linear gradient(线性渐变)绘制,代码如下:

def do_draw_rectangle_gradient(cr, width, height, radius,
                               color_stops=((0.0, 0.1, 0.1, 0.1, 1.0),
                                            (1.0, 0.6, 0.6, 0.6, 1.0))):
    if width < 2 * radius:
        width = 2 * radius
    if height < 2 * radius:
        height = 2 * radius

    # radial gradient center points for four corners, top-left, top-right, etc
    corner_tl = (radius, radius)
    corner_tr = (width - radius, radius)
    corner_bl = (radius, height - radius)
    corner_br = (width - radius, height - radius)
    corner_points = (corner_tl, corner_tr, corner_br, corner_bl)

    # linear gradient rectangle info for four sides
    side_top = (radius, 0, width - 2 * radius, radius)
    side_bottom = (radius, height - radius, width - 2 * radius, radius)
    side_left = (0, radius, radius, height - 2 * radius)
    side_right = (width - radius, radius, radius, height - 2 * radius)

    # draw four corners through radial gradient
    i = 0
    for point in corner_points:
        rg = cairo.RadialGradient(point[0], point[1], 0, point[0], point[1], radius)
        for stop in color_stops:
            if stop:
                rg.add_color_stop_rgba(*stop)
        cr.move_to(point[0], point[1])
        angle1 = math.pi + 0.5 * math.pi * i
        angle2 = angle1 + 0.5 * math.pi
        cr.arc(point[0], point[1], radius, angle1, angle2)
        cr.set_source(rg)
        cr.fill()
        i = i + 1

    # draw four sides through linear gradient
    # top side
    lg_top = cairo.LinearGradient(side_top[0], side_top[1] + radius,
                                  side_top[0], side_top[1])
    for stop in color_stops:
        if stop:
            lg_top.add_color_stop_rgba(*stop)
    cr.rectangle(*side_top)
    cr.set_source(lg_top)
    cr.fill()

    # bottom side
    lg_bottom = cairo.LinearGradient(side_bottom[0], side_bottom[1],
                                     side_bottom[0], side_bottom[1] + radius)
    for stop in color_stops:
        if stop:
            lg_bottom.add_color_stop_rgba(*stop)
    cr.rectangle(*side_bottom)
    cr.set_source(lg_bottom)
    cr.fill()

    # left side
    lg_left = cairo.LinearGradient(side_left[0] + radius,
                                   side_left[1], side_left[0], side_left[1])
    for stop in color_stops:
        if stop:
            lg_left.add_color_stop_rgba(*stop)
    cr.rectangle(*side_left)
    cr.set_source(lg_left)
    cr.fill()

    # right side
    lg_right = cairo.LinearGradient(side_right[0], side_right[1],
                                    side_right[0] + radius, side_right[1])
    for stop in color_stops:
        if stop:
            lg_right.add_color_stop_rgba(*stop)
    cr.rectangle(*side_right)
    cr.set_source(lg_right)
    cr.fill()

这里 是完整代码, 程序截图如下,

20131108-demo_pycairo_rectangle_gradient.png

图1  demo pycairo rectangle gradient

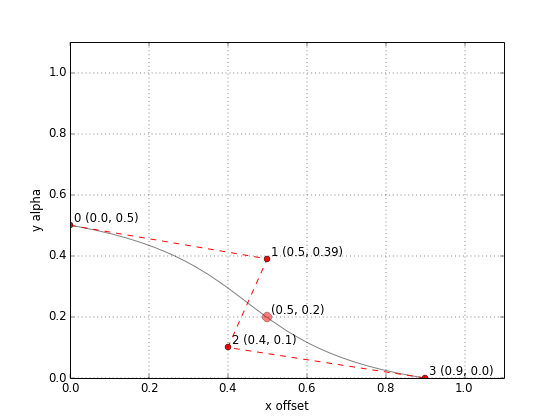
但仅仅如此还不行,为了让阴影效果最佳,还要用 bezier curve(贝塞尔曲线)来设置 color stop(颜色渐变规则),这里使用下面的曲线形式,其中X轴为 offset(偏移量,取值范围为 0~1,0 代表阴影绘制起点),Y轴为 alpha(颜色透明度,取值范围为0~1,0 代表完全透明),

20131108-matplot_bezier.png

这里 是最终代码,程序截图如下,

20131108-demo_pycairo_image_shadow.png

图2  demo pycairo image shadow

利用 expect 简化 goagent 配置过程

| Comments | posted in 代码_系统技巧 with tag expect, goagent

配置 goagent 过程中,若一次设置多个 APPID,则需要重复输入多次 gmail 和密码,较为繁琐,于是写了一个 expect 脚本来简化该过程,代码如下[1]

#! /usr/bin/expect -f

set timeout 60

if {$argc != 2} {
    set scriptname [lindex [split $argv0 "/"] end]
    send_user "Usage: $scriptname \"APPID01|APPID02..\" <email>\n"
    exit
}

proc getpass pwprompt {
    set oldmode [stty -echo -raw]
    send_user "\n$pwprompt"
    set timeout -1
    expect_user -re "(.*)\n"
    send_user "\n"
    eval stty $oldmode
    return $expect_out(1,string)
}

set appids [lindex $argv 0]
set appidlist [split [lindex $argv 0] "|"]
set email [lindex $argv 1]
set password [getpass "Please enter password: "]

set python "python2"
set uploader "/usr/share/goagent/server/uploader.zip"
set command "$python $uploader"

spawn $python $uploader
expect -nocase "appid:" {send "$appids\r"}
for {set i 0} {$i < [llength $appidlist]} {incr i} {
    set appid [lindex $appidlist $i]
    expect -nocase "application:" {send_user "\n\n==> Setup up appid: $appid"}
    expect -nocase "email:" {send "$email\r"}
    expect -nocase "password for" {send "$password\r"}
    expect -nocase "email:" {send "$email\r"}
    expect -nocase "password for" {send "$password\r"}
}

expect "上传成功" {send "\r"}
interact

使用方法很简单,运行脚本,而后输入密码即可:

sudo ./expect_goagent.tcl "appid01|appid02" your@gmail.com

设置 org-mode 导出为 html 时的代码高亮风格

| Comments | posted in 代码_emacs, 代码_web技术 with tag Q_A, blog, export, html, org_mode

结合 org-mode 与 octopress 来写博客还是挺方便的,只是遇到一个代码高亮的问题,原因是 org-mode 导出为 html 时通过 htmlize 来格式化代码,而代码风格依赖于 emacs 的外观主题,个人 emacs 常用的是暗系风格主题,但博客主题风格与之相反,这样导出的代码区块部署到博客页面会不太协调。解决办法也挺简单,为 org-publish 添加 defadvice,在发布博客前设置一个与页面协调的主题即可,个人觉得主题 github[1] 挺不错,代码如下:

(defadvice org-publish (around fsh-org-publish-advice
                                        (project &optional force async) activate)
  "Change theme before publishing, for getting a good html code highlight style through
htmlize."
  (let ((thems custom-enabled-themes))
      (dolist (theme thems)
        (disable-theme theme))
      (load-theme 'github)
      ad-do-it
      (disable-theme 'github)
      (dolist (theme thems)
        (enable-theme theme))
      ))

分享一款适用于 org-mode 的简洁风 LaTeX 简历模板

| Comments | posted in 代码_emacs, 代码_文档图表 with tag latex, org_mode

使用 org-mode 导出 LaTeX 简历对我个人而言还是有一定吸引力的,原因之一是 org-mode 同时还可以导出为 html 文件,使得应用范围变得更广。于是自己参考了一些网上资料[1][2]编写了一个简单的简历模板,源码可以到这里找到,下面是使用示例及对应 pdf 文件。

#+LaTeX_HEADER: \usepackage{fsh_orgmode_cv}
#+LaTeX_HEADER: \usepackage{xltxtra,fontspec,xunicode,xeCJK}
#+LaTeX_HEADER: \setCJKmainfont{AR PL New Kai}

#+TITLE: 个人简历

* 示例 一级标题
** 二级标题
   *二级正文*

   正文正文正文正文正文正文正文正文正文

** 二级标题
   *二级正文*

   正文正文正文正文正文正文正文正文正文正文正文正文正文正文正文正文正文
   正文正文正文正文正文正文正文正文正文

示例 pdf 下载

org-mode 导出 html 时中文空格问题的临时解决方法

| Comments | posted in 代码_emacs, 代码_web技术 with tag Q_A, blog, export, html, org_mode

最近开始使用 org-mode 写博客,发现导出为 html 后中文之间掺杂着不少多余的空格,对阅读有一定影响,搜索后发现该问题与 w3c 标准有关[1][2],属于历史遗留问题,短时间内应不会解决。

后通过学习 ox-html 源码,找到一种临时解决方法[3],通过给函数 org-html-paragraph 添加 defadvice,使得导出 html 前自动将段落中的多行中文合并为一行,且不会影响源文件,个人认为还算实用,可供参考(org-mode 8.x 下工作正常):

(defadvice org-html-paragraph (before fsh-org-html-paragraph-advice
                                      (paragraph contents info) activate)
  "Join consecutive Chinese lines into a single long line without
unwanted space when exporting org-mode to html."
  (let ((fixed-contents)
        (orig-contents (ad-get-arg 1))
        (reg-han "[[:multibyte:]]"))
    (setq fixed-contents (replace-regexp-in-string
                          (concat "\\(" reg-han "\\) *\n *\\(" reg-han "\\)")
                          "\\1\\2" orig-contents))
    (ad-set-arg 1 fixed-contents)
    ))